"Oh look. Another plain, featureless stone wall and plain, featureless stone floor with a plain, featureless stone ceiling. I absolutely love the way these dungeons look, Kovath. The constant sameness isn't at all boring or monotonous."
"I'm glad you lik-- wait, from your tone that was sarcasm. What's your problem now?"
"Well, can't we - I don't know - spruce things up a little? A mosaic here, some rough-hewn stone there, maybe some cave paintings?"
"I am not letting you hang Zarlazz Junior's fingerpainting in our dungeon. This is procedural generation, not arts and crafts with Miss Nuggurath."
"Look, just because you don't have a family doesn't mean you should --"
"Okay, okay. We can make the dungeon 'prettier' if you insist."
I've started doing a pretty simple thing to up my map game. It allows us to go from plain black and white maps to something a little more visually interesting.
 |
| Before |
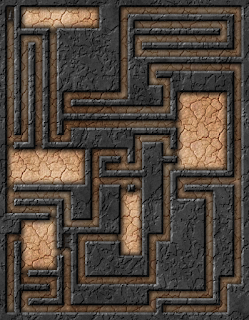 |
| After |
- Generate a dungeon that looks good to you and click the Save as PNG button and save the resulting file somewhere you can find easily;
- Open the file you created in step one in Gimp;
- Select the Select by Color tool in the top right of the toolbox inside GIMP;
- select any white space on the dungeon map;
- press delete on your keyboard. The map should now look like this:
- Take the eraser tool and remove all the doors, portcullises and secret doors from the dungeon. (One day you'll be able to skip this step once we get player maps implemented);
- Click Filters then select Dungeon Map Maker in the dropdown;
- In the new window that opens up, you'll have lots of options to play with. For now, we'll keep it pretty simple. If you intend to use these in a VTT like Maptool, Fantasy Grounds or Roll20, You'll want to skip adding a grid here, and let that software provide the hex grid;
- Change the Template Color to Black by clicking on the white color swatch, then clicking and dragging anywhere in the color window up to the top left corner;
- Change Template Colour Identifies to Walls;
- Change Fill Floor With to Pattern - Select Below (we could change the pattern, but the default one is neat for this tutorial);
- Click OK;
- After the filter does it's magic, click File then export and save it somewhere. Isn't she lovely?
The resulting map is way prettier than anything the generator will kick out on it's own. From there, you can add in a few objects and doors found online for something really awesome. The techniques are useful even if you want to hand draw a black and white map then spice it up a bit.
Feel free to share map making tips in the comments!


No comments:
Post a Comment